Deployment overview
This document describes how to set up multi-factor authentication (MFA) for Microsoft Office 365® with AuthPoint as an identity provider. Office 365 must already be configured and deployed before you set up MFA with AuthPoint.
Office 365 can be configured to support MFA in several modes. For this integration, we set up SAML with AuthPoint.
To undo the changes made to your domain after you complete the steps in this procedure, see the Rollback Instructions section at the end of this integration guide.
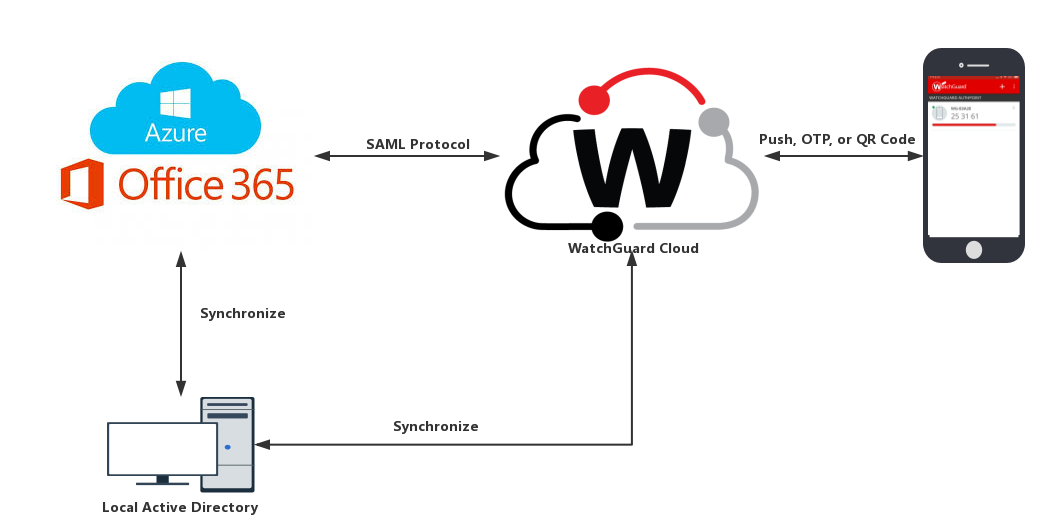
Office 365 Authentication Data Flow with AuthPoint
AuthPoint communicates with various cloud-based services and service providers with the SAML protocol. This diagram shows the data flow of an MFA transaction for a Office 365.
Before You Begin
Before you begin these procedures, make sure that:
- You have installed and configured the AuthPoint Gateway
- End-users can log in to Office 365
- A token is assigned to a user in AuthPoint (to test MFA)
- You have an AuthPoint identity provider (IdP) certificate
Configure Office 365
To start, you must download the metadata file from the Resources page in the AuthPoint management UI. Once you have the metadata file, you can configure Office 365.
- Log in to WatchGuard Cloud.
- From the navigation menu, select Configure > AuthPoint. If you have a Service Provider account, you must first pivot to your Subscriber view.
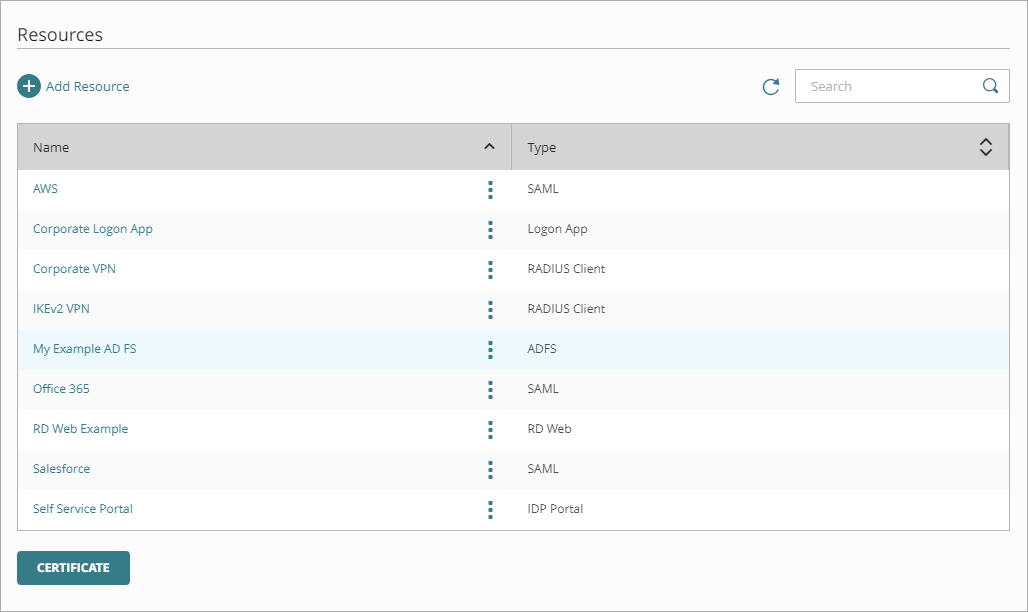
- Select Resources.
- Click Certificate.
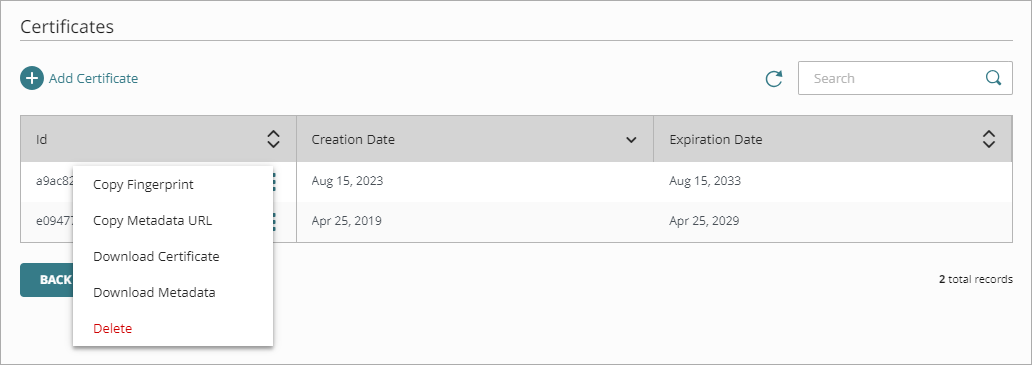
- Next to AuthPoint certificate you will associate with your resource, click
 and select Download Metadata.
We recommend that you choose the certificate with the latest expiration date.
The AuthPoint metadata provides your resource, in this case Office 365, with information necessary to identify AuthPoint as a trusted identity provider.
- Go to https://docs.microsoft.com/en-us/office365/enterprise/powershell/connect-to-office-365-powershell#connect-with-the-microsoft-azure-active-directory-module-for-windows-powershell and use the information there to prepare your environment for identity federation. You must sync your local AD users to Azure AD.
- Launch the Windows Azure Active Directory Module for Windows PowerShell you configured in the previous step. Type Connect-MsolService to log in with your Office 365 Administrator Credentials.
The default domain and initial domain in Office 365 cannot be federated. You must register another domain with Office 365 or follow the Microsoft guidelines to connect an existing domain to the Office 365 service. The configured domain can then be used when you configure AuthPoint.
-
Type Get-msoldomain -domain youroffice365domain.com to return the status of domains and verify that your account is not federated. If your domain is already federated, you must follow the steps in the Rollback Instructions section to change the status of your domain from federated back to managed before you continue.
If your domain is federated, we recommend that you run this command to return your settings: $saml = Get-MsolDomainFederationSettings -DomainName <domain_name>. This information is necessary if you want to undo the changes made to your domain.
- Set these federation parameters as PowerShell variables:
- $dom = "<your_Office_365_domain>.com"
- $url = "https://sp.authpoint.<your WatchGuard Cloud region>.cloud.watchguard.com/saml/<your specific value>/sso/spinit" (This URL appears in your AuthPoint metadata file, labeled as SingleSignOnService)
- $uri = “https://sp.authpoint.cloud.watchguard.com/<your specific value>" (This URL appears in your AuthPoint metadata file, labeled as entityID)
- $logoutUrl = "https://sp.authpoint.<your WatchGuard Cloud region>.cloud.watchguard.com/saml/<your specific value>/slo/spinit" (This parameter is optional and appears in your AuthPoint metadata file, labeled as SingleLogoutService)
- $cert = <the X.509 certificate in string format> (This URL appears in your AuthPoint metadata file, labeled as X509Certificate)
To help you format the X.509 value as a string, see https://www.samltool.com/format_x509cert.php.
If you require authentication for desktop applications or other non-browser clients, you must also set this parameter for the AuthPoint ECP endpoint for Office 365 to use Basic Authentication:
- $ecpurl = https://sp.authpoint.<WatchGuard Cloud region>.cloud.watchguard.com/accounts/<your account ID>/saml/ecp
- Convert the Office 365 domain to federated with this PowerShell command:
Set-MsolDomainAuthentication -DomainName $dom -Authentication Federated -PassiveLogOnUri $url -IssuerUri $uri -LogOffUri $logoutUrl -PreferredAuthenticationProtocol SAMLP -SigningCertificate $cert.
If you need to enable Basic Authentication, the command must include -ActiveLogOnUri $ecpurl.
If you use the Microsoft Partner Center, the command must include -SupportsMfa $true.
- Verify your domain to make sure it is federated with the PowerShell command:
Get-msoldomain -domain youroffice365domain.com
Complete these steps to configure Skype for Business:
- Download the Skype for Business Online Powershell Module (https://www.microsoft.com/en-us/download/details.aspx?id=39366)
- Run PowerShell as an administrator.
- Run these commands:
- Import-Module SkypeOnlineConnector
- $userCredential = Get-Credential
This command must be used with an Office 365 administrator account on a domain that is not federated, usually the default Office 365 domain (<domain>.onmicrosoft.com)
- $sfbSession = New-CsOnlineSession -Credential $userCredential
- Import-PSSession $sfbSession
- Type this command:
Set-CsOAuthConfiguration -ClientAdalAuthOverride Allowed
This change takes about two hours to take effect.
Configure AuthPoint
Before AuthPoint can receive authentication requests from Office 365, you must specify the Office 365 client as a resource in AuthPoint. You must also assign the Office 365 resource to the user group that will authenticate through Office 365.
Add a SAML Resource in AuthPoint
From the AuthPoint management UI:
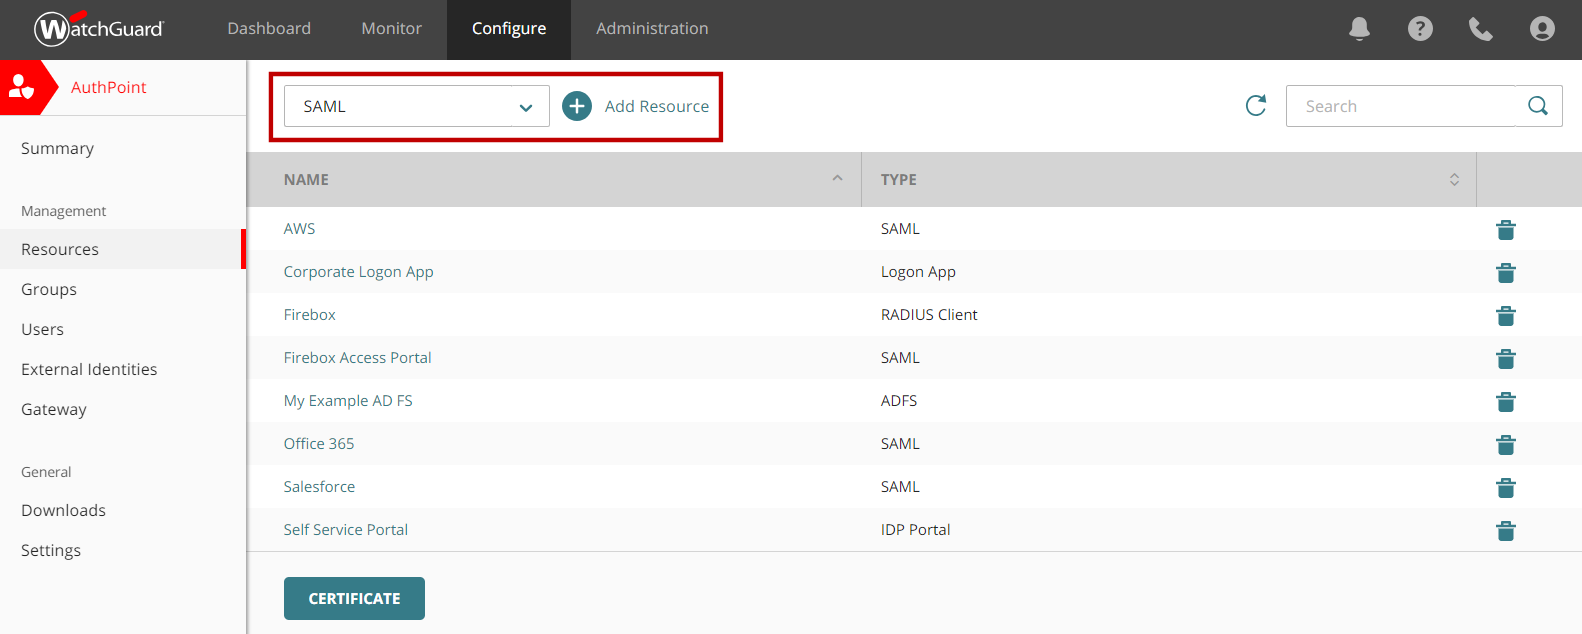
- From the navigation menu, select Resources.
- From the Choose a Resource Type drop-down list, select SAML. Click Add Resource.
- From the Application Type drop-down list, select Office 365.
- In the Service Provider Entity ID text box, type urn:federation:MicrosoftOnline.
- In the Assertion Consumer Service text box, type https://login.microsoftonline.com/login.srf.
- In the Federated Domain text box, type your federated domain.
- Click Save.
Add an Access Policy to AuthPoint
You must have at least one user group in AuthPoint for authentication with Office 365 and you must assign an access policy for the Office 365 resource to that group. If you already have a group, you do not have to add another group.
Access policies for an Office 365 resource have a Basic Authentication option (also called Enhanced Client or Proxy) that you must enable if you require authentication for desktop applications or other non-browser clients.
In the AuthPoint management UI:
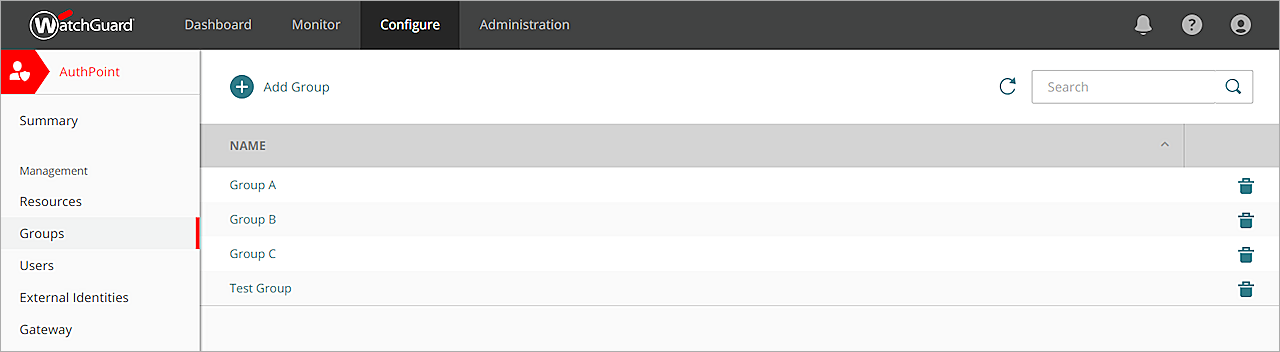
- Select Groups.
- To add a new group, click Add. If you already have a group that you want to use, click the Name of your group to edit it.
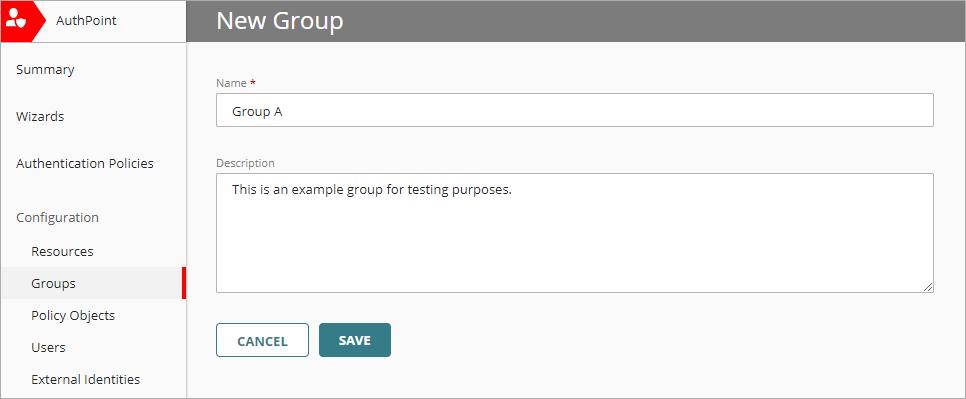
- In the Name text box, type a descriptive name for the group.
- (Optional) In the Description text box, type a description of the group.
- In the Access Policy section, click Add Policy.

- In the Add Policy dialog box, from the Resource drop-down list, select the resource you want to add an access policy for.
- (Optional) To require that users type their password before they authenticate for this resource, select the Require Password Authentication toggle.
- If you require authentication for desktop applications or other non-browser clients, select the Basic Authentication toggle.
- Select which authentication options users in this group can choose from when they authenticate.
For SAML resources, if you select more than one authentication option, users must choose one of the available options when they authenticate. For example, if you select OTP and Push users can choose whether to type their OTP or approve a push to authenticate, but you cannot require that they do both.

- Click Add.

- (Optional) Add one or more safe locations to your group. For more information about safe locations and detailed instructions to add them, see About Safe Locations.
- Click Save.

Synchronize Users from Your Active Directory
You must sync your local AD users (which you synced to Azure AD earlier) to AuthPoint so that the users have the same attributes and they can be recognized by both Office 365 and AuthPoint.
To sync users to AuthPoint from Active Directory, you must add an external identity in AuthPoint. External identities connect to user databases to get user account information and validate passwords. For detailed instructions, see About External Identities.
If you use ADFS, you must add an ADFS resource in the AuthPoint management UI and install the ADFS agent on your ADFS server. For detailed instructions to configure ADFS, see MFA for ADFS.
If you have not installed and configured a Gateway, you must do so before you configure ADFS or sync users from your LDAP database. For more information, see About Gateways.
Test the Integration
To test the integration of AuthPoint and Office 365, you can authenticate with a mobile token on your mobile device. You can choose any method (one-time password, QR code, or push).
In this example, we test the integration with the push authentication method (users receive a push notification in the mobile app that they must approve to authenticate).
If you enable Basic Authentication, we recommend that you also test MFA with an app that uses Basic Authentication.
- In a web browser, connect to Office 365.
- Type your email address or AuthPoint user name. Click Next.
- If required, in the Password text box, type your password.
- For the authentication method, select Push.
- Click Send.
- Approve the authentication request that is sent to your mobile device.
You are logged in to Office 365.
Rollback Instructions
This section is for users who want to undo the changes made to their domain. The steps in this section describe how to change the status of your domain from federated back to managed and how to reconfigure the settings for a previously federated domain.
Microsoft Office 365 does not support multiple federations on a single domain. Before you begin, confirm the status of your domain in Office 365.
To change the status of your domain from federated back to managed:
- Run PowerShell. Type Connect-MsolService to log in with your Office 365 Administrator Credentials.
- Type Get-msoldomain -domain youroffice365domain.com to verify your domain status.
- Type Set-msoldomainauthentication -DomainName youroffice365domain.com -Authentication Managed to modify the status.
- Type Get-msoldomain -domain youroffice365domain.com again to verify the status of your domain is now Managed.
To restore the settings for a federated domain:
To restore the settings for your previously federated domain, you must have run the command $saml = Get-MsolDomainFederationSettings -DomainName <domain_name> in the Configure Office 365 section.
- Run PowerShell. Type Connect-MsolService to log in with your Office 365 Administrator Credentials.
- Type Get-msoldomain -domain youroffice365domain.com to verify your domain status.
- Type Set-MsolDomainAuthentication -DomainName <domain_name> -FederationBrandName $saml.FederationBrandName -Authentication Federated -PassiveLogOnUri $saml.PassiveLogOnUri -ActiveLogOnUri $saml.ActiveLogonUri -SigningCertificate $saml.SigningCertificate -IssuerUri $saml.IssuerUri -LogOffUri $saml.LogOffUri -PreferredAuthenticationProtocol "SAMLP".